How to Uninstall Oracle Database from Windows
Uninstalling Oracle Database 12c from Windows is a mostly manual process, similar to uninstalling Oracle Database 11g, with a few additional steps at the end. To avoid errors and ensure a clean uninstall, follow these detailed steps carefully.
Step 1: Delete Environment Variables
Removing the environment variable related to Oracle Home can prevent issues during reinstallation, such as the PRVF-3929 error (“Environment variable path is too long”).
How to Delete Environment Variables
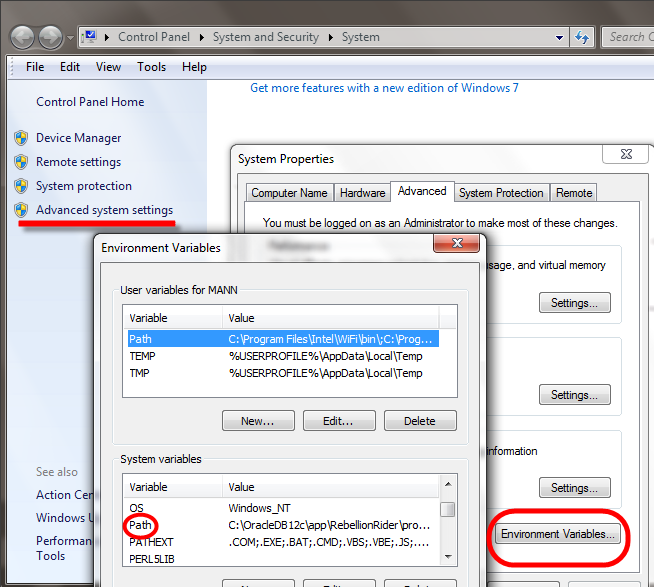
- Open System Properties: Right-click on “Computer” and select “Properties”. In the System Properties window, click on “Advanced system settings”.
- Access Environment Variables: In the “System Properties” window, go to the “Advanced” tab and click “Environment Variables”.
- Edit Path Variable: In the “Environment Variables” window, locate the “Path” entry under “System variables”, double-click it, and find the Oracle Home path. Delete this entry.

Step 2: Delete Registries
Oracle Database creates several registry entries during installation. To fully uninstall Oracle Database 12c, you need to stop all Oracle services and delete these registry entries. Be cautious when editing the registry, as incorrect changes can harm your system. Back up the registries before making changes.
How to Delete Oracle Registries
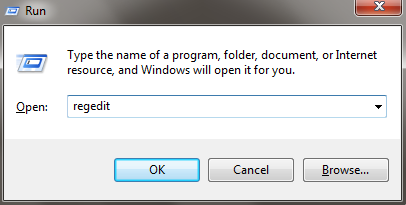
- Open Registry Editor: Press Win + R to open the Run dialog, type
regedit, and press Enter. - Delete Oracle Software Registry:
- Navigate to
HKEY_LOCAL_MACHINE\SOFTWARE. - Find and delete the “Oracle” directory.
- Navigate to

- Delete Oracle Database Services Registries:
- Navigate to
HKEY_LOCAL_MACHINE\SYSTEM\CurrentControlSet\Services. - Find and delete all entries related to Oracle. Be cautious if other Oracle products are installed; delete only the relevant entries.
- Navigate to

Backup Registries
- Oracle Software Registry: Navigate to
HKEY_LOCAL_MACHINE\SOFTWARE, right-click on “SOFTWARE”, select “Export”, choose a location, name the file, and save it. - Oracle Services Registries: Navigate to
HKEY_LOCAL_MACHINE\SYSTEM\CurrentControlSet, right-click “CurrentControlSet”, select “Export”, choose a location, name the file, and save it.
Step 3: Restart Your System
Restart your computer to apply the changes made to the system settings.
Step 4: Delete the Oracle Home Directory
The Oracle Home directory contains all installed Oracle software.
- Navigate to Oracle Home Directory: Go to the drive where Oracle 12c is installed (usually C:), then to
APP\YOUR_USERNAME\product\12.2.0\dbhome_1. - Delete Directory: Select all files and delete them. Exclude
flash_recovery_areaif you wish to keep backups.
If the folder does not delete, refresh or reboot your system and try again. Ensure all Oracle-related services and registries have been removed before retrying.
Step 5: Delete Directory from Program Files
Navigate to your Program Files directory and delete the folder named “Oracle”.
Step 6: Delete Directory from Start Menu
Go to C:\ProgramData\Microsoft\Windows\Start Menu\Programs, locate the “Oracle” folder, and delete it.
Step 7: Clear Temporary Files and Recycle Bin
- Clear Temporary Files: Open the Run dialog (Win + R), type
%temp%, and delete all files in the folder. - Empty Recycle Bin: Right-click on the Recycle Bin on your desktop and select “Empty Recycle Bin”.
Step 8: Delete the Oracle User
Finally, remove the Oracle home user created during installation:
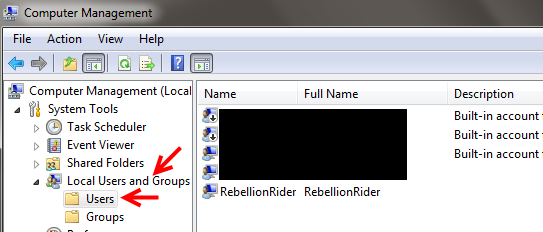
- Open Computer Management: Right-click “Computer” and select “Manage”.
- Delete User: Go to “Local Users and Groups” > “Users”, find the Oracle home user (e.g., “RebellionRider”), right-click, and select “Delete”.

Now that you have successfully uninstalled Oracle, if you wish to deepen your understanding and application of SQL, besides databases, you can also try learning some SQL tools, such as SQLynx. It is free for personal use and supports various databases including MySQL, Oracle, PostgreSQL, SQLite, SQL Server, Hive, MongoDB, and more.